
Say you have a website and you want to convert that HTML design to WordPress. In this tutorial you will learn how to quickly and easily convert any website to WordPress. With what you are about to learn, you will be able to convert your old website to WordPress and gain the freedom to edit, amend, update or do anything with your website whenever you want and in real time.
Finally, if your are looking for a professional web design company to convert your website to WordPress, please contact us for a free consultation.
How WordPress works
You would think converting your existing website to WordPress would be hard, but in fact, it's actually pretty easy. At the most basic level, WordPress consist of about four basic parts:
header
content
sidebar
footer
Each one of these parts holds a small section of code that form together to make the website. WordPress then relies on PHP to call each of those sections individually to generate the page dynamically.
So instead of having lots of HTML in one massive file, the header, content, sidebar, footer, what WordPress does is it allows you separate your code up into smaller files, one file for each section of the document. So every time you write a page WordPress constructs that page using the same header, index, sidebar, footer and as it does for one page it does for all.
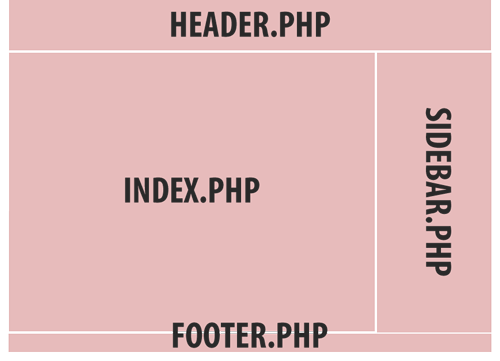
This is a graphic to show the various template sections of the theme, including the header, index,sidebar and footer modules.
Alright, here it comes. The first thing I'm going to need you to do is to create a folder and name it whatever you want your theme to be called. Next, make a file called style.css and place it in the folder you just made.
Preparing the Stylesheet
The heart of the theme is style.css the style sheet. It is one of the few files that is absolutely necessary for converting your website to WordPress, not only because the style sheet manages the theme structure and the like, but because it starts with the theme declaration.
At the top of style.css add the following:
/*
Theme Name: Give Your Theme A Name.
Theme URI: Your Theme's URI
Description: Say Something About Your Theme.
Version: 1.0
Author: You
Author URI: Your Website.
*/
That little snippet will tell WordPress that this is your theme, what your theme is called etc.
That done, take moment to examine your original website, find your style sheet, then copy and paste your style rules into your style.css after your theme declaration info.
Convert your HTML to WordPress
Next thing you need to do is to sort through your original HTML, find those 4 portions of HTML that make up your header, sidebar, content, footer and place some markers there so that you can come back and begin to extract each section into a separate file. I think you know where this is going.
Next I want you to make four more files, index.php, header.php, sidebar.php, footer.php and place them in your theme directory. Now open up your header.php file and copy and paste the code bellow into it.
<head>
<meta charset="<?php bloginfo( 'charset' ); ?>" />
<meta name="viewport" content="width=device-width" />
<title><?php wp_title( '|', true, 'right' ); ?></title>
<link rel="profile" href="http://gmpg.org/xfn/11" />
<link rel="pingback" href="<?php bloginfo( 'pingback_url' ); ?>" />
<?php // Loads Your Style Sheet ?>
<link rel="stylesheet" href="<?php bloginfo( 'stylesheet_url' ); ?>" type="text/css" media="screen, projection" />
<?php wp_head(); ?>
</head>
Next open your original HTML again and take out the section that you marked off as your header and paste it into your header.php file right bellow the closing head tag. Save your file and exit. Follow the same instructions for both the sidebar.php and footer.php files. Finally, open your footer.php file again and add the following code, right at the end:
<?php wp_footer(); ?>
Heading towards the home stretch
If you made it this far, you're only ONE final step away from converting your website to WordPress! Open your index.php file and add this line at the top:
<?php get_header(); ?>
Now go to the very bottom of the file and add these two lines.
<?php get_sidebar(); ?>
<?php get_footer(); ?>
You may remember at the outset I mentioned how WordPress relies on PHP to call on different files to piece together the final structure. That's exactly what we just did here. Now anytime you need to edit your header or add something to your sidebar or your footer, you just need to edit one file and you're good to go.
Next open your original HTML document again, copy the original section of HTML that contains the tags that wrap around your content and paste it into your index.php file, right below the php call to header function above.
Now all that is left to do is to add the content via The Loop. The WordPress Loop is the PHP function that WordPress uses to call and display your posts from the database they are saved in. Copy and paste the following snippet in between the two HTML tags that will display your content.
<!-- Start the Loop. -->
 <?php if ( have_posts() ) : while ( have_posts() ) : the_post(); ?>


 <!-- Display the Title as a link to the Post's permalink. -->

 <h3><a href="<?php the_permalink() ?>" rel="bookmark" title="Permanent Link to <?php the_title_attribute(); ?>"><?php the_title(); ?></a></h3>


 <!-- Display the date (November 16th, 2009 format) and a link to other posts by this posts author. -->

 <small><?php the_time('F jS, Y') ?> by <?php the_author_posts_link() ?></small>


 <!-- Display the Post's content in a div box. -->

 <div class="entry">
   <?php the_content(); ?>
 </div>


 <!-- Display a comma separated list of the Post's Categories. -->

 <p class="postmetadata">Posted in <?php the_category(', '); ?></p>


 <!-- Stop The Loop (but note the "else:" - see next line). -->

 <?php endwhile; else: ?>


 <!-- The very first "if" tested to see if there were any Posts to -->
 <!-- display.  This "else" part tells what do if there weren't any. -->
 <p>Sorry, no posts matched your criteria.</p>


 <!-- REALLY stop The Loop. -->
 <?php endif; ?>
Now you just upload your theme to your /wp-content/themes/your-theme/ directory, log into your WordPress admin area and activate your theme.
See, that was easy?
This tutorial taught you how to convert any static website to WordPress. Converting an outdated website to WordPress is one of the most beneficial and cost reducing initiative that you can take for your company and for your business website. Converting a website to WordPress is not only a step to cut down costs but also to make managing the website a cakewalk. If you still need assistance converting your website to WordPress, hop over to the Contact page and get in touch with one our employees.
If you liked this post, you should subscribe to the blog feed or follow me on Google+ and join our WordPress community to share your questions, insights, and solutions to common WP customization problems.
